
Do you need inspiration for a Happy Father’s Day Card? Read on…..
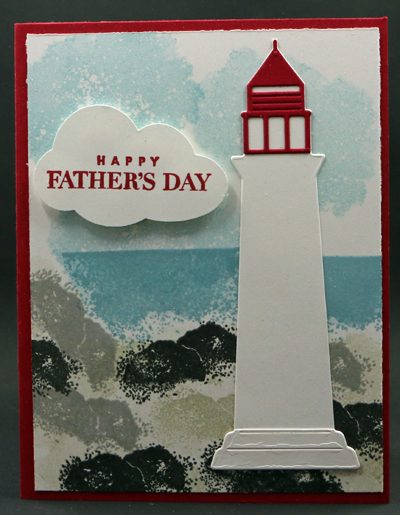
Father’s Day is a day set aside to celebrate the special Fathers is our lives and all that they do for us. This card is inspired by Nova Scotia’s famous Lighthouse in Peggy’s Cove, Nova Scotia.
SUPPLIES
Stamps:
Celebrating You (cling 158028)
Lighthouse Point (photopolymer 158901) * save 10% using the Lighthouse Point Bundle (158907)
Ink:
Real Red Classic Stampin’ Pad (147084)
Balmy Blue Classic Stampin’ Pad (147105)
Sahara Sand Classic Stampin’ Pad (147117)
Smoky Slate Classic Stampin’ Pad (147113)
Basic Gray Classic Stampin’ Pad (149165)
Paper (including Cutting Dimensions):
Real Red Cardstock {CS} (102482) 5-1/2” x 8-1/2” scored at 4-1/4” [Card Base], 1”x 2”
Basic White Cardstock {CS} (159276) 4-1/4” x 5-1/2”, 2-1/4” x 5-1/2”, 4” x 4”, 4” x 5-1/4” [Card Insert] optional
Photocopy Paper
Accessories:
Bone Folder (102300)
Stampin’ Pierce Mat (126199)
Clear Block C (118486) **
Clear Block D (118485) ** OR Save 10% using the Clear Block Bundle (118491)
Cloud Punch (157749)
Stampin’ Scrub (126200) OR Simply Shammy (147042)
Stampin’ Mist (153648)
Stampin’ Cut & Emboss Machine (149653) OR Mini Stampin’ Cut & Emboss Machine (150673)
Lighthouse Dies (158906) * Save 10% using the Lighthouse Point Bundle (158907)
Take Your Pick (144107) – Paper Piercer End
Adhesive Sheets (152334)
Stampin’ Seal (152813)
Stampin’ Dimensionals (104430)
Medium Envelopes – Basic White (159236)
INSTRUCTIONS
1. Ink up the Happy Father’s Day stamp from the Celebrating You Stamp Set using Real Red Ink. Stamp it onto the 4” x 4” piece of Basic White Cardstock and punch it out using the Cloud Punch.
2. Fold the piece of Real Red cardstock in half and crease it using the Bone Folder. The fold should be along the left hand side. This is the Card Base.
3. Ink up the Water Stamp from the Lighthouse Point Stamp Set using Balmy Blue Ink. This is the stamp with the horizon line on it. Stamp it on the left had side of the 4-1/4” x 5-1/2” piece of Basic White Cardstock. Re-ink and stamp it on the right hand side. It is ok if they overlap, because the Lighthouse will cover it.
4. It up the Round Shaped Stamp using Balmy Blue, but stamp it off on the piece of Photocopy Paper and then stamp it in the area for the sky. I repeated this process 3 times to create the sky. It is OK if it overlaps with the Water.
5. We will start to create the shoreline. Clean off the Round Shaped Stamp using Stampin’ Scrub and Stampin’ Mist OR Simply Shammy and water. Ink up the Round Shaped Stamp using Sahara Sand Ink, but stamp it off on the piece of Photocopy Paper and then stamp it in the area of the shoreline. I repeated this process 4 times to create the first layer of the shoreline.
6. Ink up the 2 Rocks Stamp using Sahara Sand Ink. This time stamp it directly onto the Basic White Cardstock. I stamped it 3 times. Clean the 2 Rocks Stamp using Stampin’ Scrub and Stampin’ Mist OR Simply Shammy and water. This is the second layer of the shoreline.
7. Ink up the 2 Rocks Stamp using Smoky Slate Ink. Stamp it directly onto the Basic White Cardstock. I stamped it 3 times. Clean the 2 Rocks Stamp using Stampin’ Scrub and Stampin’ Mist OR Simply Shammy and water. This is the Third layer of the shoreline.
8. Ink up the 2 Rocks Stamp using Basic Gray Ink. Stamp it directly onto the Basic White Cardstock. I stamped it 5 times. Clean the 2 Rocks Stamp using Stampin’ Scrub and Stampin’ Mist OR Simply Shammy and water. This is the Fourth layer of the shoreline.
9. Run the 2-1/4” x 5-1/2”piece of Basic White CS through the Stampin’ Cut & Emboss Machine OR Mini Stampin’ Cut & Emboss Machine using the Solid Lighthouse Die. Run it thru again and only cut the very bottom of the Lighthouse. Adhere it to the larger piece using Stampin’ Seal.
10. Adhere a 1” x 2” piece of Adhesive Sheet to the Real Red Cardstock of the same size. Run it thru either one of the Stampin’ Cut & Emboss Machine using the top of the Lighthouse Die. Peel the backing off of the Adhesive Sheet using the Piercer End of the Take your Pick Tool and adhere it to the top of the Basic White Lighthouse. Adhere the entire Lighthouse to the Card Front using Stampin’ Seal.
11. Adhere the stamped Cloud to the card Front using Stampin’ Dimensionals.
12. Decorate inside of Card using stamps as desired; decorate Envelope if you choose.