
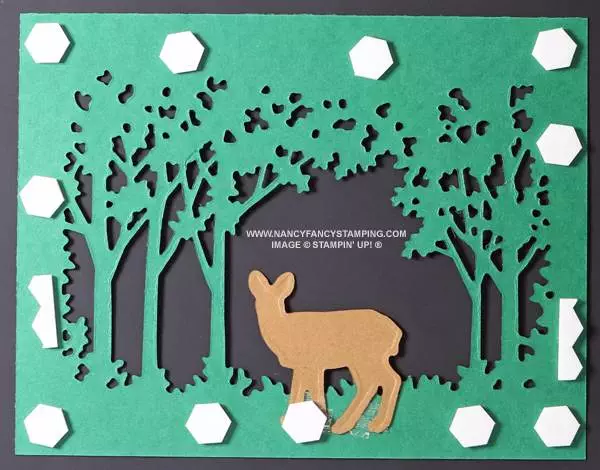
Do you have a hunter in your life or someone that loves the outdoors? This card features the woods, a Deer and shows you how to create depth with 3D scenery and the Grove Dies.

This is the masculine Birthday Card was easy to make for my husband, Shawn using the Grassy Grove Stamp Set and Dies. You could substitute the sentiment and it could be a masculine Thank You, Thinking of You, Merry Christmas etc. Card.
SUPPLIES
Stamp:
Happy Birthday – RETIRED – I’m not sure of the Stamp Set
Inks:
Balmy Blue Classic Stampin’ Ink Refill (147168)
Pecan Pie Classic Stampin’ Pad (161665)
Paper (including Cutting Dimensions):
Shaded Spruce Cardstock {CS} (146981) 5-1/2” x 8-1/2”, 4-1/2” x 5-1/2” & 1-1/2” x 5-1/2”
Pecan Pie Cardstock {CS} (161717) 2” x 2”
Basic White Cardstock {CS} (159276) 4-1/8” x 5-3/8”, 1” x 4-1/2” & 3-3/4” x 5” (inside)
Accessories:
Bone Folder (102300)
Clear Block D (118485) & Clear Block H OR Clear Block Bundle (165674) and save 10%
Grove Dies (157844) –Tree Frame, Deer & Large Hill
Stampin’ Cut & Emboss Machine (149653) OR Mini Stampin’ Cut & Emboss Machine (150673)
Banners Pick A Punch (153608) – RETIRED
Water Painters (151298) – Wide Brush Tip
Wink of Stella Clear Glitter Brush (141897)
Stampin’ Seal+ (149699)
Stampin’ Dimensionals (104430)
Basic White Medium Envelopes (159236)
Pen/Pencil
Margarine Lid
Photocopy
INSTRUCTIONS
- Fold the largest piece of Shaded Spruce CS in half and crease it using the Bone Folder. The fold should be along the top.
- Run the middle sized Shaded Spruce CS through the Stampin’ Cut & Emboss Machine OR Mini Stampin’ Cut & Emboss Machine using the Tree Frame.
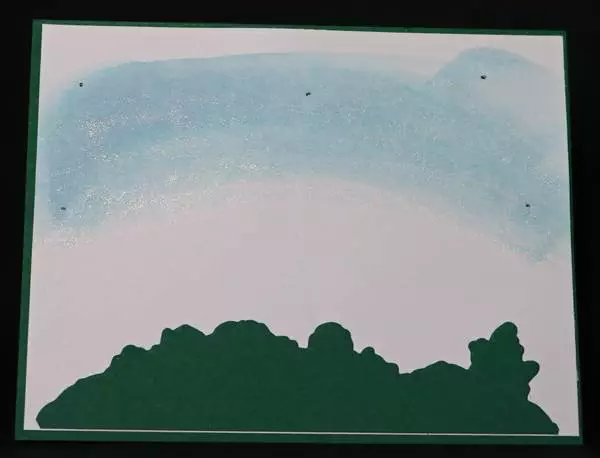
- Lay the Shaded Spruce Tree Frame on the Basic White CS. While it is still in place, mark a couple of dots on the Basic White CS. (See Photo #2). These marks will guide you to where you are going to add the Balmy Blue Sky. Drip 2 drops of Balmy Blue Classic Stampin’ Ink from the Refill Bottle onto the margarine lid. You can use any plastic lid. TIP: Flip the margarine lid over and use the side that doesn’t have the writing on it. I use the margarine lid, because it has a lip on it and if something spills, it will stay within the lid. Fill up the Wide Brush Tip Water Painter with water. Gently squeeze a couple drops of water and mix it with the Balmy Blue drops. You can test it on a scrap piece of photocopy paper to make sure that you have the desired look. Now you will paint the Balmy Blue Sky using the marks as a guide for where the sky should be. Set aside to dry.
- Run the smallest sized Shaded Spruce CS through the Stampin’ Cut & Emboss Machine OR Mini Stampin’ Cut & Emboss Machine using the Large Hill Die.
- Once the Basic White CS is dry, adhere it to the Shaded Spruce card front using Stampin’ Seal+. Then, adhere the Shaded Spruce Large Hill to the Basic White CS using Stampin’ Seal+.
- Swipe the Wink of Stella Clear Glitter Brush all over the Balmy Blue sky. This is to add a little sparkle to your card.
- Run the Pecan Pie CS through the Stampin’ Cut & Emboss Machine OR Mini Stampin’ Cut & Emboss Machine using the Deer Die.
- Flip the Shaded Spruce Tree Frame over and apply Stampin’ Seal+ and stick the Pecan Pie Deer to it. TIP: Make sure that you are looking at the back of the Deer. This way when you flip the frame back around, you’ll be able to see the front of the deer. TIP: You are gluing the Deer to this frame and not the Large Hill layer that is already adhered to the card front. This is how you create depth in this Hunter’s 3D Scenery Happy Birthday Card (See Photo #3).
- While the Shaded Spruce Tree Frame is still flipped over, apply Stampin’ Dimensionals as shown in Photo #3. Don’t forget the Deer’s feet.
- Ink up the “HAPPY BIRTHDAY” sentiment (or whichever sentiments that you use), using Pecan Pie Ink and stamp it onto the 1” x 4-1/2” piece of Basic White CS. I used the Banners Pick A Punch to create the banner ends. Insert 1 end into the 1” slot in the Banners Pick A Punch and punch. Remove, turn the stamped Basic White CS around and punch the other end.


")
I hope you enjoyed this Hunter’s 3D Scenery Happy Birthday Card! If you would like to make this project yourself, but you need some catalogue product to do so, please feel free to contact me at (902)455-7259 OR Email Me at nancy@nancyfancystamping.com OR Click here to visit my Online Stampin’ Up! Store
This card shows a that you can use a stamp set and dies to create a 3D Scenery for a Hunter or someone that loves the outdoors, to celebrates their birthday. I hope that this inspires you to try it yourself.