
Learn how to make this adorable Halloween card’s layers with nesting dies for a quick and easy look!
Once you see how easy it is to make card layers with nesting dies, you will want to use this almost-instant technique on any card. For today’s project I used the Countryside Corner Dies (161471) from Stampin’ Up! so you can see how even shaped dies can be used for this simple way to create layers.
Nesting dies are a set of dies that are roughly the same shape and start out small and get larger in a series of sizes. These types of dies are perfect for layering on any project, but for this card, I’m going to insert the Basic Black Cardstock into the Lemon Lime Twist Cardstock to form a single layer. Check it out.

I wanted the colours to be intense for the Frankenstein and Vampire faces, so I Heat Embossed the faces onto the Lemon Lime Twist and the Fresh Freesia Cardstocks using Black Embossing Powder and a Heat Tool. It makes them look very shiny and gives you great colour intensity.
SUPPLIES
Stamp:
Trick & Treat (photopolymer 162223) *Purchase the Tricks & Treats Bundle (162226) and save 10%
Inks:
VersaMark Pad (102283)
Paper (including Cutting Dimensions):
Fresh Freesia Cardstock {CS} (155613) 5-1/2” x 8-1/2” & 3” x 3”
Lemon Lime Twist Cardstock {CS} (144245) 4-1/4” x 5-1/2” & 3” x 3”
Basic Black Cardstock {CS} (121045) 4” x 5-1/4”
Basic White Cardstock {CS} (159276) 2-1/2” x 3”
Accessories:
Bone Folder (102300)
Stampin’ Pierce Mat (126199)
Clear Block D (118485)
Trick & Treat Dies (162225) *Purchase the Tricks & Treats Bundle (162226) and save 10%
Countryside Corners Dies (161471)
Stampin’ Cut & Emboss Machine (149653) OR Mini Stampin’ Cut & Emboss Machine (150673)
Basics Embossing Powders (155554) – Black
Embossing Additions Tool Kit (159971)
Heat Tool (129053)
Stampin’ Seal + (149699)
Stampin’ Dimensionals (104430)
Basic White Medium Envelopes (159236)
Post-It-Notes
INSTRUCTIONS (See further down in the post for photos)
- Fold the Fresh Freesia CS in half and crease it using a Bone Folder. The fold should be along the top.
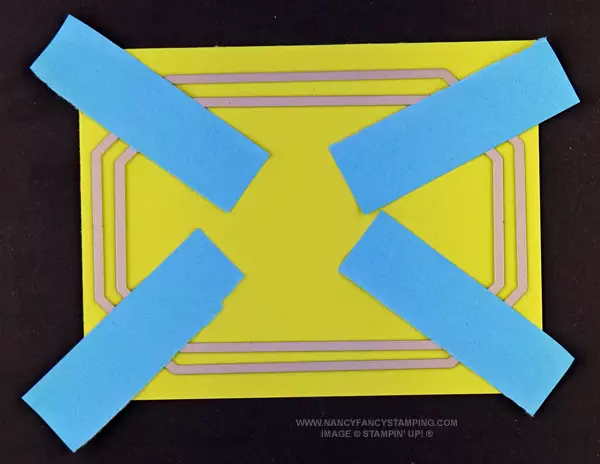
- Take the largest and the second largest rectangle frames from the Countryside Corners Nested Dies. Position the dies largest in the center of the Lemon Lime Twist CS. Center the second largest die in the center of the largest. Once you have checked to make sure all of the spacing is even, rip off the sticky parts of the Post-It-Notes and use them to hold these frames in place as you run through the Stampin’ Cut & Emboss Machine OR Mini Stampin’ Cut & Emboss Machine. TIP: If you CENTRE the dies on the Lemon Lime Twist CS, you’ll be left with a frame that you can use on another project.
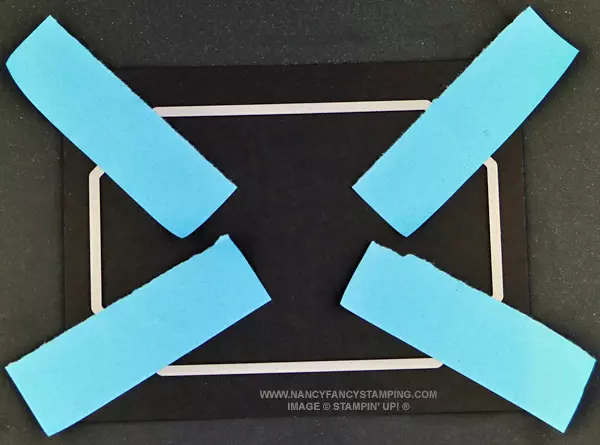
- Take the second largest rectangle frames from the Countryside Corners Dies. Position it in the center of the Basic Black CS. Reuse the sticky parts of the Post-It-Notes to hold this frame in place as you run through the Stampin’ Cut & Emboss Machine OR Mini Stampin’ Cut & Emboss Machine.
- Insert the Basic Black CS into the Lemon Lime Twist CS center and flip it over. Adhere the Stampin’ Seal+ where the 2 colours meet to help secure them and hold them together. Adhere this layer to the Fresh Freesia Card Base using Stampin’ Seal +.
- TIP: Swipe the Lemon Lime Twist CS using the Embossing Buddy that comes with the Embossing Additions Tool Kit. This will keep the static away, so the Black Embossing Powder won’t stick where there isn’t any VaersaMark Ink. Ink up Frankenstein using VersaMark Ink and stamp onto the Lemon Lime Twist CS as shown. Hold the stamped Lemon Lime Twist CS over the Powder Pal and dump the Black Embossing Powder over the wet Frankenstein’s face. Tap off the excess Black Embossing Powder into the Powder Pal. Using the Tweezers that come with the Embossing Additions Tool Kit, hold onto the Lemon Lime Twist CS and heat set the Black Embossing Powder using the Heat Tool. Cut out Frankenstein’s head using the outline Die from the Trick & Treat Dies and the Stampin’ Cut & Emboss Machine OR Mini Stampin’ Cut & Emboss Machine.
- Repeat the process in step 5, using the Vampire face and VersaMark Ink and stamp onto the Fresh Freesia CS as shown. Cut out Vampire’s head using the outline Die from the Trick & Treat Dies and the Stampin’ Cut & Emboss Machine OR Mini Stampin’ Cut & Emboss Machine.
- Repeat the process in step 5, using the “Trick or Treat” sentiment and VersaMark Ink and stamp onto the Basic White CS as shown. Cut out sentiment using the outline Die from the Trick & Treat Dies and the Stampin’ Cut & Emboss Machine OR Mini Stampin’ Cut & Emboss Machine. Now that you have finished using the Black Embossing Powder, remove the plug at the end of the Powder Pal, using the Paint Brush that comes with the Embossing Additions Tool Kit; brush the Black Embossing Powder back into the Jar.
- Adhere the Frankenstein head, Vampire head and the Trick or Treat sentiment to the card front using Stampin’ Dimensionals.
- Decorate the inside and envelope if you would like.
Do you want the step by step instructions for how to create the nesting dies technique? Here it is….
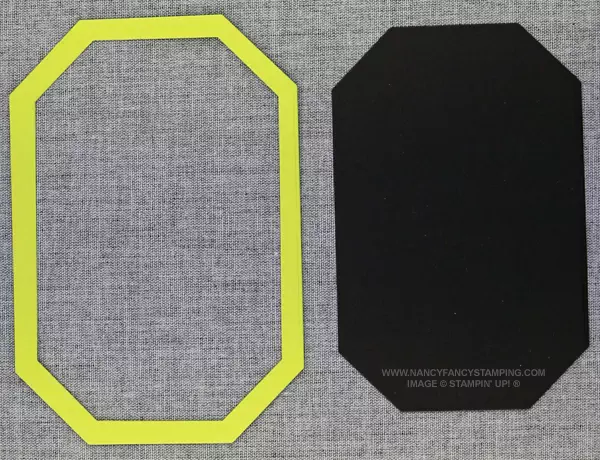
Here is a photo of the Countryside Dies in place on the Lemon Lime Twist Cardstock. I found that the sticky parts of the Post-It-Notes are the best thing to keep the dies in place. By using the 2 dies in this step, you are creating a frame that the Basic Black CS will fit into it.
This is what it looks like for the Basic Black CS. Remember that you can reuse the sticky strips of the Post-It-Notes
This is what the Lemon Lime Twist and the Basic Black Cardstocks look like before I adhere them together.
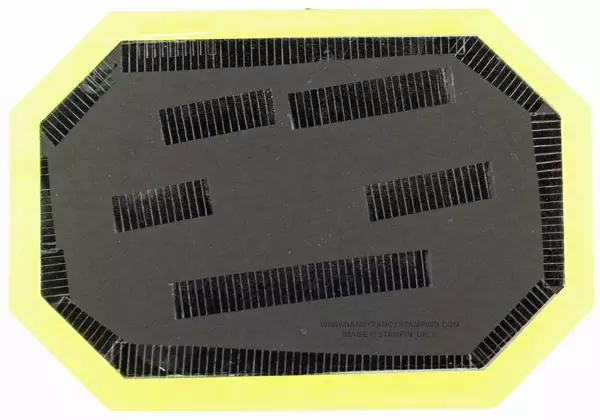
This is showing the flip side of the Basic Black inside of the Lemon Lime Twist Frame. Can you see where the Stampin’ Seal+ over laps the 2 cardstocks. This is what is holding this together and preventing the Basic Black Cardstock from falling out.
If you centred the dies on the cardstock from the beginning, this is what you should have left over after they have been cut. There is no waste and you can use these pieces on another project. This is a time and money saving tip.

The following products are what I used to create today’s cute handmade Nesting Dies Trick or Treat Halloween Card. Click on the photo to see the details for that product. Also, you can order them using this website. EMAIL ME if you have any questions or would like me to place the order for you.
Product List")
")


")


One thing I really like about this Nesting Dies Trick or Treat Halloween Card is that you get a chance to use the Nesting Dies and the Embossing Powder Techniques in the same adorable card. Did I inspire you to try these techniques? You can also create layers with nesting dies using the Nested Essential Dies (161597), Stylish Shapes (159183) or Tailor Made Tags (155563). There is no end to the possibilities with these nested dies!