
This Sympathy Card is an easy way to step up a Card that I shared before, using the same Stampin’ Up! products, but with a little twist.
The simple card using Cheerful Daisies stamp set that I shared in my Newsletter was stepped up on a previous post. In that post I show you the version that was in my newsletter and a stepped up version. Click here to see those samples, supply list and the instructions to create them.
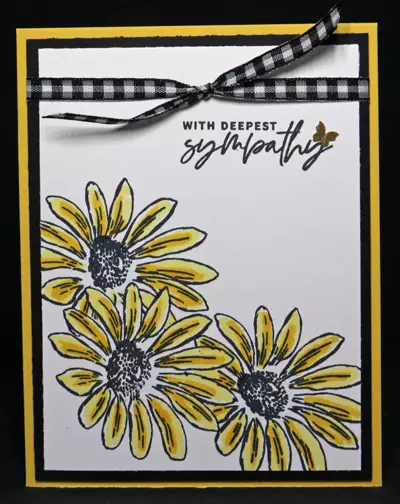
As you can see, I turned the Card from a “Happy Birthday” Card into a “With Deepest Sympathy” Card. I still kept the 3 Daises using the Masking Technique, but I stepped it up again when I coloured the petals using both of the Daffodil Delight Stampin’ Blends – Light and Dark and changed the orientation from horizontal to vertical. Just think, that is 3 different looks, 3 different levels of stamping (beginner, casual & avid) and using the same products. That is getting the most bang for your buck.
SUPPLIES
Stamps:
Cheerful Daisies (photopolymer 161290)
Something Fancy (cling 160416)
Inks:
Tuxedo Black Memento Pad (132708)
Daffodil Delight Stampin’ Blends Combo Pack (154883) – Light and Dark Daffodil Delight
Paper (including Cutting Dimensions):
Daffodil Delight Cardstock {CS} (119683) 5-1/2” x 8-1/2”
Basic Black Cardstock {CS} (121045) 4” x 5-1/4”
Basic White Cardstock {CS} (159276) 3-3/4” x 5”
Accessories:
Bone Folder (102300)
Stampin’ Pierce Mat (126199)
Clear Block A (118487) & Clear Block D (118485) OR Purchase Clear Block Bundle (118491) and save 10%
Masking Paper (155480)
Black & White 1/4” Gingham Ribbon – 15”
Paper Snips (103579)
Brushed Brass Butterflies (158136)
Stampin’ Seal + (149699)
Stampin’ Dimensionals (104430)
INSTRUCTIONS:
- Fold the Daffodil Delight CS in half and crease it using a Bone Folder. The fold should be along the left hand side.
- Adhere the Basic Black CS to the Daffodil Delight card base using Stampin’ Seal +.
- The large outline Daisy goes on the Clear Block D. Ink up the Daisy using Tuxedo Black Memento Pad Ink and stamp onto the Masking Paper. Stamp onto the side of the Masking Paper that DOES NOT have the split. Fussy cut around the Daisy using the Paper Snips. Peel the backing paper off to expose the sticky side. This is the mask that will be used to cover the center Daisy.
- Stamp the Daisy in the middle and cover it using the mask. Re-ink the Daisy after each time you stamp the image. It is OK to go off the edge of the Basic White CS when you stamping the other 2 Daisy images. Leave the mask in place and let the stamp overlap it.
- Remove the mask. How much do you love that overlapping look?
- The Daisy Center goes on the Clear Block A. Ink up the Daisy Center using Tuxedo Black Memento Pad Ink. Re-ink the stamp after each use.
- This is the section that is stepped up. Colour in the Daisy petals using the Light Daffodil Delight Stampin’ Blend. You don’t have to be perfect. You can leave white areas if you want to. Go back to the Daisies and colour the lines using the Dark Daffodil Delight Stampin’ Blend.
- The “WITH DEEPEST sympathy” sentiment goes on the Clear Block D. Ink up the sentiment using Tuxedo Black Memento Ink. Stamp the sentiment onto the Basic White CS. I chose this sentiment from the Something Fancy Stamp Set, but you can use a sentiment that you have on hand.
- Adhere the stamped Basic White CS to the Basic Black CS using Stampin’ Seal +.
- Cut a 15” piece of Black & White 1/4” Gingham Ribbon using the Paper Snips. Wrap it around the stamped Basic White CS/Basic Black CS layer and tie in a bow. Trim the edges if needed using Paper Snips. Adhere to the card front using Stampin’ Dimensionals.
- Adhere a Brushed Brass Butterfly to the card front.
Here are all the products I used today to make another easy stepped up handmade sympathy card:
Product List")
")


 Gingham Ribbon")


I hope you try out this another easy way to step up a handmade card and experiment with other simple steps you can do to add a little sumthin’ sumthin’ to a card you’ve made and love but that you want to dress up just a little bit.
Leave a comment and let me know which one you liked best.
Click here to see the previous samples, supply list and the instructions to create them.