
Come see one very easy way to step up a handmade card for endless variations.
Sometimes you only have a couple of minutes to make a card and sometimes you have time to be more creative. Today I want to share a fast and easy way to step up a handmade card you’ve previously created with just a few little touches. This way, you can use those extra cards you’ve made in a new way.
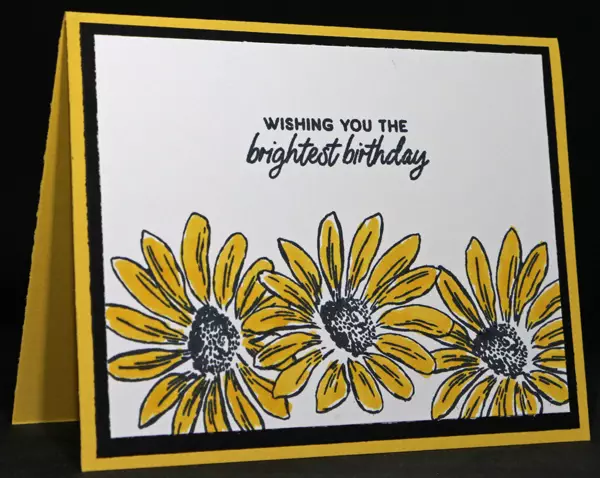
Here is a card that I made for a friend who likes very simple, streamlined looks.
This Sympathy Card is a step up from that one. All you have to do is step it up – a card making term that means adding something to a project to jazz it up a little – by adding some ribbon and embellishments.

Let’s get to it! I am going to share all the steps for both the cards here. I’ve included details on the masking technique as this works well with flowers or any object that you want to stamp multiples and have them overlap each other. And if you keep this trick between us they will never know how easy it is to create this illusion! They’ll run their finger over it to see if they can tell how you layered the daisies.
SUPPLIES
Stamps:
Cheerful Daisies (photopolymer 161290)
Something Fancy (cling 160416)
Inks:
Tuxedo Black Memento Pad (132708)
Daffodil Delight Stampin’ Blends Combo Pack (154883) – Dark Daffodil Delight
Paper (including Cutting Dimensions):
Daffodil Delight Cardstock {CS} (119683) 5-1/2” x 8-1/2”
Basic Black Cardstock {CS} (121045) 4” x 5-1/4”
Basic White Cardstock {CS} (159276) 3-3/4” x 5”
Accessories:
Bone Folder (102300)
Stampin’ Pierce Mat (126199)
Clear Block A (118487) & Clear Block D (118485) OR Purchase Clear Block Bundle (118491) and save 10%
Masking Paper (155480)
Black & White 1/4” Gingham Ribbon – 15”
Paper Snips (103579)
Brushed Brass Butterflies (158136)
Stampin’ Seal + (149699)
Stampin’ Dimensionals (104430)
INSTRUCTIONS:
- Fold the Daffodil Delight CS in half and crease it using a Bone Folder. The fold should be along the top.
- Adhere the Basic Black CS to the Daffodil Delight Card Base using Stampin’ Seal +.
- The large outline Daisy goes on the Clear Block D. Ink up the Daisy using Tuxedo Black Memento Pad Ink and stamp onto the Masking Paper. Stamp onto the side of the Masking Paper that DOES NOT have the split. Fussy cut around the Daisy using the Paper Snips. Peel the backing paper off to expose the sticky side. This is the mask that will be used to cover the center Daisy.
- Stamp the Daisy in the middle and cover it using the mask. Re-ink the Daisy after each time you stamp the image. It is OK to go off the edge of the Basic White CS when you stamping the other 2 Daisy images. Leave the mask in place and let the stamp overlap it.
- Remove the mask. How much do you love that overlapping look?
- The Daisy Center goes on the Clear Block A. Ink up the Daisy Center using Tuxedo Black Memento Pad Ink. Re-ink the stamp after each use.
- Colour in the Daisy petals using the Dark Daffodil Delight Stampin’ Blend. You don’t have to be perfect. You can leave white areas if you want to.
- The “WITH DEEPEST sympathy” sentiment goes on the Clear Block D. Ink up the sentiment using Tuxedo Black Memento Ink. Stamp the sentiment onto the Basic White CS. I chose this sentiment from the Something Fancy Stamp Set, but you can use a sentiment that you have on hand.
- Adhere the stamped Basic White CS to the Basic Black CS using Stampin’ Seal +. You’ve just made the basic card.
- Now to step it up, cut a 15” piece of Black & White 1/4” Gingham Ribbon using the Paper Snips. Wrap it around the stamped Basic White CS/Basic Black CS layer and tie in a bow. Trim the edges if needed using Paper Snips. Adhere to the card front using Stampin’ Dimensionals instead of Stampin’ Seal +. Using Stampin’ Dimensionals will add to the step up look and help to take it to the next level.
- Adhere a Brushed Brass Butterfly to the card front.
If you subscribe to my newsletter you already received an article with the supply list and the instructions to make the basic version of the Birthday Card that is the inspiration for this stepped up Sympathy Card. Although it is very simple, it would still bring a smile to someone on their special day with its cheery colors and sweet sentiment. If you don’t already subscribe to my info-packed newsletters, I invite you to do that here.
Here are all the items I used today to make this sweet handmade sympathy card:
")
")


 Gingham Ribbon")


I hope you try out this easy way to step up a handmade card and experiment with other simple steps you can do to add a little sumthin’ sumthin’ to a card you’ve made and love but that you want to dress up just a little bit.