
Have you seen a shaker card and wondered how did they do that? Today I am sharing some tips and tricks on how to make a shaker card like this one!
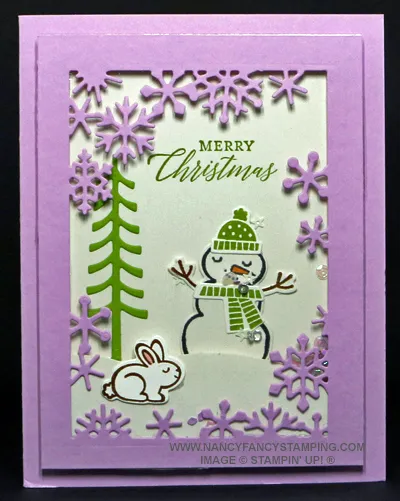
I recently had a customer ask me a question about a shaker card and I thought to myself I’ll answer it in my newsletter for everyone. Today I am going to go into more detail and show you the steps for how to make a shaker card like this one. This is snowman shaker card that I created and gave to some of my customer last year for Christmas. Some of the products have retired, but the process can be adapted to the supplies that you have and to suit any occasion.
This is a very in depth shaker card, but they all don’t have to be this elaborate. All a shaker card is technically is a card with a front panel that has a Window Sheet, so you can see what is on the back panel. It has to be wide enough, so sequins or other embellishments are free to move around when you shake the card. The gap is created when you use the Foam Adhesive Strips. It is that simple.
In the meantime, here’s how YOU can make this adorable snowman shaker card at home.
SUPPLIES
Stamps:
Snowman Magic (photopolymer 159816) *RETIRED
Regal Reindeer (cling 159722) – Merry Christmas *RETIRED
Inks:
Granny Apple Green Classic Stampin’ Pad (147095)
Soft Suede Classic Stampin’ Pad (147115)
Tuxedo Black Memento Pad (132708)
Pumpkin Pie Stampin’ Blends Como Pack (154897) – Dark
Flirty Flamingo Stampin’ Blends Como Pack (154884) – Light
Paper (including Cutting Dimensions):
Fresh Freesia Cardstock {CS} (155613) 5-1/2” x 8-1/2” & 3-3/4” x 5”
Shimmer White Cardstock {CS} (101910) 3-3/4” x 5” & 2” x 5”
Basic White Cardstock {CS} (159276) 1-3/4” x 6”
Granny Apple Green Cardstock {CS} (146990) 1-1/2” x 3”
Accessories:
Bone Folder (102300)
Stampin’ Pierce Mat (126199)
Clear Block B (117147), Clear Block C (118486) & Clear Block D (118485) OR Purchase Clear Block Bundle (118491) and save 10%
Color Lifter (144608)
Snowman Dies (159817)*RETIRED
Stampin’ Cut & Emboss Machine (149653)
Sparkle & Shine Sequins Assortment (158137)
Take Your Pick Tool (144107)
Take Your Pick Die Brush Tip and Foam Pad (149655)
Paper Snips (103579)
Window Sheets 12” x 12” (142314) – 3-3/4” x 5”
Embossing Additions Tool Kit (159971) – Embossing Buddy
Sparkle & Shine Sequins Assortment (158137)
Adhesive Sheets (152334)
Foam Adhesive Strips (141825)
Stampin’ Seal + (149699)
INSTRUCTIONS
- Fold the Fresh Freesia CS in half and crease it using a Bone Folder. The fold should be along the left hand side.
- Run the other piece of the Fresh Freesia CS through the Stampin’ Cut & Emboss Machine using the Frame from the Snowman Dies. Save the little pieces that are punched out. Set them aside to be used as filler in your shaker card. If you are having troubles removing the little pieces, you could use the Take Your Pick Tool with the Die Brush Tip and Foam Pad. This is the front panel of you Shaker Card.

3. BEFORE you assemble the shaker card, you should lay the cut out 3-3/4” x 5” Fresh Freesia CS Frame on top of the 3-3/4” x 5” Shimmer White CS. This will help you centre the wording. Leave the Fresh Freesia Frame in place. Ink up the “Merry Christmas” sentiment from the Regal Reindeer Stamp Set using Granny Apple Green Ink and stamp it onto the Shimmer White CS. The stamped Shimmer White CS will be the back panel of the Shaker Card. See photo #2
4. It would be hard to use adhesive on the Granny Apple Green tree without it oozing out, so I suggest using an Adhesive Sheet. Cut the Adhesive Sheets the same size as the Granny Apple Green CS. Peel off one side of the Adhesive Sheet and stick it to the Granny Apple Green CS. Run this through the Stampin’ Cut & Emboss Machine using the tree from the Snowman Dies. Set aside. Do not peel off the backing to expose the adhesive until you are ready to adhere it to the Shimmer White CS.
5. Ink up the hat and scarf using the Granny Apple Green Ink and stamp it on the Basic White CS. Ink up the bunny and the snowman arms using Soft Suede Ink and stamp it on the Basic White CS. Ink up the snowman body using Tuxedo Black Memento Ink and stamp on the Basic White CS. Cut out all of these parts using the corresponding dies and Stampin’ Cut & Emboss Machine.
6. Colour the snowman’s carrot using Dark Pumpkin Pie Stampin’ Blend and the bunny’s ear using Light Flirty Flamingo Stampin’ Blend. Use the Color Lifter if you colour outside of the lines. This will remove the Stampin’ Blend Ink. Let it dry completely. You can always go back and use it again if faint Stampin’ Blend Ink is still present.
7. Cut a snowy hill using the 2” x 5” Shimmer White CS and Paper Snips. This is done free hand and you can go back and trim it as needed.
8. Assemble the snowman by flipping over the body and adding Stampin’ Seal + where you want the arms to go. Adhere them. Flip over the hat and scarf and add Stampin’ Seal + to them. Adhere them to the snowman body. Set aside until you are ready to adhere it to the Shimmer White CS back panel.

- Flip the Fresh Freesia Frame over and add Stampin’ Seal + to the outer edge. Adhere the 3-3/4” x 5” Window Sheet. Very lightly swipe the Embossing Buddy from the Embossing Additions Tool Kit over the Window Sheet before you proceed. You don’t want to scratch it. This will take away the static, so the Sparkle & Shine Sequins won’t stick to the Window Sheet. Add the Stampin’ Seal + to the bottom edge of the Fresh Freesia Frame/Window Sheet layers. Adhere the snowy hill. This is a good time to lay these layers over the Shimmer White CS, so you can line up where you want to adhere the tree and the snowman. The position will depend on how you cut out your snowy hill. The Fresh Freesia Frame/Window Sheet layers make up the front panel of the shaker card. See photo #3
- Very lightly swipe the Embossing Buddy from the Embossing Additions Tool Kit over the Shimmer White before you proceed. This will take away the static, so the Sparkle & Shine Sequins won’t stick. Peel the backing off of the tree and stick it in place on the Shimmer White CS. Add Stampin’ Seal + to the back of the finished Snowman and stick him in place on the Shimmer White CS. This is the back panel of the shaker card. See photo #3
- There has to be a gap in your shaker card, so you can add Sparkle & Shine Sequins. You create this by outlining the BACK of the front panel using Foam Adhesive Strips. You remove the Foam Adhesive Strips from the package. It will be sticky on that side. You position them so there are no gaps. I put the cross piece behind the prevent the Sparkle & Shine Sequins from going lower then it needed to go. That would be a waste. Also, helps because I was mailing some of these Cards. I didn’t want them to get damaged going through the postal machine because they were uneven. See photo #3
- Now comes that time to add the sparkle. I put the little pieces that remained after I cut out the Fresh Freesia Frame and 3 pinches of Sparkle & Shine Sequins, right in the middle. Remember that the front panel is still flipped over. Carefully remove the Foam Adhesive Strips backing. Leave the front panel just as it is. Take and flip over the Shimmer White CS back panel. You won’t be able to see the tree, snowman or the “Merry Christmas”. You should be looking at the back of the Shimmer White CS. Line it up. Take a deep breath and adhere the back panel to the front panel. Go around and press all of the sides. You don’t want the Sparkle & Shine Sequins to get loose. Doing it this way, will prevent the Sparkle & Shine Sequins from flying everywhere. They are safe in the middle of the front panel They don’t move. See photo #3
- We can’t forget about the bunny. Flip him over and add Stampin’ Seal + and then adhere him the front of the Window Sheet. He looks like he is on the snowy hill, but the Window Sheet is between them.
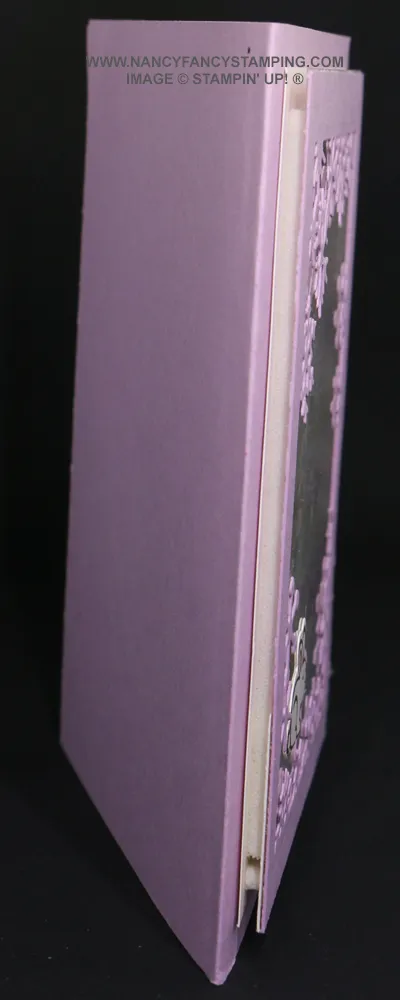
14. You have made a shaker card, but now we have to attach it to the Fresh Freesia Card Base. Add Stampin’ Seal + to the back of the Shimmer White CS and adhere the shaker part of the Card to the Card Base. You can see how thick it is. It will be the thickness of the Shimmer White CS + Foam Adhesive Strips + Window Sheet + snowy hill Shimmer White CS + Fresh Freesia Frame and the Fresh Freesia Card Base. See photo #4
15. This is my favourite thing to do. Now you can shake your shaker card.
16. Decorate the inside and Envelope if you would like.
The following products are what I used to create today’s cute handmade Snowman Shaker Card. Click on the photo to see the details for that product. Also, you can order them using this website. Email me if you have any questions.
Product List


I know that this looks like a lot. The main thing to remember is what is in photo #2. The position of the front panel and the back panel. Stamp something on the back panel, create a front panel frame, adhere the Window Sheet, adhere the Foam Adhesive Strips, add the Sequins and then put it all together. Now that you know how to make a shaker card, go have fun.