
This super cute handmade ladybug birthday card uses 3 easy techniques to add awesome details!
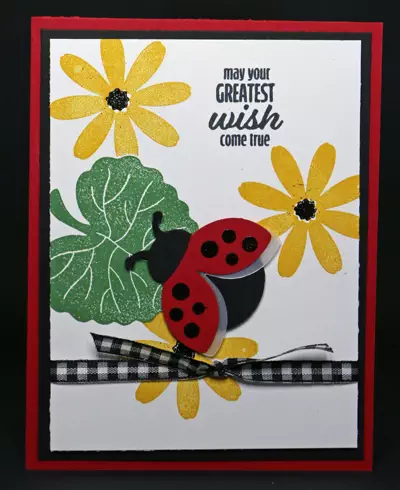
Did you see this Hello Ladybug Stamp Set on page 30 of the 2022-2023 Annual Catalogue and needed an idea? Today I have put together this handmade ladybug birthday card that uses three easy to do techniques to add lots of cute details. Be on the look out for videos to show these techniques in action in the future!
In the meantime, here’s how YOU can make this adorable ladybug card at home.
SUPPLIES
Stamp:
Hello Ladybug (photopolymer 157693)
Inks:
Garden Green Classic Stampin’ Pad (147089)
Crushed Curry Classic Stampin’ Pad (147087)
Tuxedo Black Memento Pad (132708)
VersaMark Pad (102283)
Paper (including Cutting Dimensions):
Real Red Cardstock {CS} (102482) 5-1/2” x 8-1/2” & 1-1/2” x 4”
Basic Black Cardstock {CS} (121045) 4” x 5-1/4” & 1-1/2” x 4”
Basic White Cardstock {CS} (159276) 3-3/4” x 5” & 1-1/4” x 3-3/4”
Vellum Cardstock {CS} (101856) 1-1/2” x 4”
Accessories:
Bone Folder (102300)
Stampin’ Pierce Mat (126199)
Clear Block A (118487), Clear Block B (117147), Clear Block C (118486) & Clear Block D (118485) OR Purchase Clear Block Bundle (118491) and save 10%
Masking Paper (155480)
Paper Snips (103579)
Ladybug Builder Punch (157698)
Basics Embossing Powders (155554) – Black
Embossing Additions Tool Kit (159971)
Heat Tool (129053)
1/4” Black & White Gingham Ribbon (156485) – 12”
Stampin’ Seal + (149699)
Stampin’ Dimensionals (104430)
INSTRUCTIONS
- Fold the Real Red CS in half and crease it using a Bone Folder. The fold should be along the left hand side.
- Adhere the Basic Black CS to the Real Red Card Base using Stampin’ Seal +.
- The Leaf goes on the Clear Block D. Ink up the Leaf using Garden Green Ink and stamp onto the Basic White CS as shown. It is OK to go off the edge of the Basic White CS. Ink up the Leaf again, using Garden Green Ink and stamp onto the side of the Masking Paper that DOESN’T have the split. It doesn’t have to be perfect. Fussy cut the Leaf out using your Paper Snips. Peel off the backing. The opposite side that you stamped will be sticky. Adhere this side over the Leaf that you stamped on the Basic Black CS. Line it up the best that you can.
- The “may your GREASTEST wish come true” sentiment goes on the Clear Block B. Ink up the sentiment using Tuxedo Black Memento Ink. Stamp the sentiment onto the Basic White CS.
- Adhere the Daisy to Clear Block C. Ink up the Daisy using Crushed Curry. Stamp directly onto the Leaf Masking Paper. Don’t worry, it will be OK. Re-ink the Daisy Stamp and stamp again. Repeat this process 1 more time. Adhere the Flower Center to Clear Block A. Ink up the Flower Center using VersaMark Ink and stamp onto the Daisy Center. Re-ink and repeat this 1 more times. Hold the Basic White CS over the Powder Pal and dump the Black Embossing Powder over the wet Flower Centers. Tap off the excess Black Embossing Powder into the Powder Pal. Remove the plug at the end of the Powder Pal. Using the Paint Brush that comes with the Embossing Additions Tool Kit; brush the Black Embossing Powder back into the Jar. Using the Tweezers that come with the Embossing Additions Tool Kit, hold onto the Basic White CS and heat set the Black Embossing Powder using the Heat Tool. Remove the Leaf Masking Paper. You could store it in the Hello Ladybug Stamp Set case for future use.
- To create the Lady bug, flip your Ladybug Builder Punch over and insert the 1-1/2” x 4” Basic Black CS and punch as usual. To create the Vellum Wings, flip the Ladybug Builder Punch over and insert the 1-1/2” x 4” Vellum CS. Punch as usual.
- To create the Black Embossed Wings, you have to line up the dots with the punch. Flip the Ladybug Builder Punch over to see which way the Wings are positioned and made sure that you stamp the Dots the same way that they are going to be punched out. The Dots goes on the Clear Block B. Ink up the Dots using VersaMark Ink and stamp onto the 1-1/2” x 4” piece of Real Red CS. Hold the Real Red CS over the Powder Pal and dump the Black Embossing Powder over the wet Dots. Tap off the excess Black Embossing Powder into the Powder Pal. Remove the plug at the end of the Powder Pal. Using the Paint Brush that comes with the Embossing Additions Tool Kit; brush the Black Embossing Powder back into the Jar. Using the Tweezers that come with the Embossing Additions Tool Kit, hold onto the Real Red CS and heat set the Black Embossing Powder using the Heat Tool. Insert the stamped Real Red CS into the Ladybug Builder Punch. Line it up so you can see the Dots and make sure that they are positioned where you want them and then punch.
- Flip the Real Red Wings over and apply Stampin’ Seal + to the opposite side of the stamped Dots. Line up the Vellum Wings and press to stick them. Flip these2 layers over and apply Stampin’ Seal + and stick them to the Basic Black Body. Adhere your Ladybug to the Leaf using Stampin’ Dimensionals.
- Cut a 12” Piece of 1/4” Black & White Gingham Ribbon using Paper Snips. Wrap it around the Basic White CS layer and tie in a knot. Trim if needed. Adhere the stamped Basic White CS to the Card Front using Stampin’ Dimensionals
- Decorate the inside and Envelope if you would like.
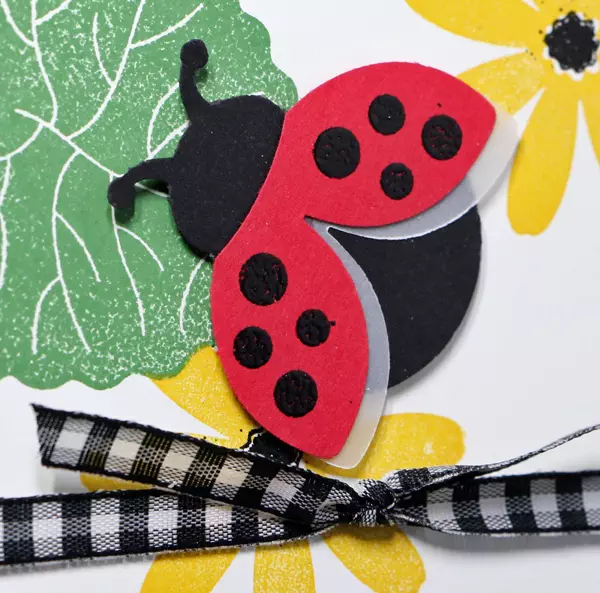
Here is a detailed view of the ladybug from this card. It shows a close up of the Vellum Wings, the Embossed Dots on Real Red Wings and the 1/4” Black & White Gingham Ribbon knot.
This project shows how you can incorporate multiple techniques within one Card. You could also make a simple card by using Tuxedo Black instead of embossing them. You could stamp the Daisies alongside of the Leaf and then you wouldn’t need the Masking Paper. You wouldn’t get the same WOW “How did she do that?” reaction, but it would be OK if you needed a card in a rush. I was really drawn to the punched Ladybug image and I wouldn’t change that part of the card. So whether you copy this Ladybug Birthday Card exactly like I created it or use parts of it for inspiration, I hope you create one like this today.
The following products are what I used to create today’s cute handmade Ladybug Birthday Card. Click on the photo to see the details for that product. Also, you can order them using this website. Email me if you have any questions
Product List")


")
 Gingham Ribbon")


One thing I really like about this handmade ladybug birthday card is that you can change up the sentiment and have a very sweet card for lots of other occasions. What would YOU send this card to celebrate?