
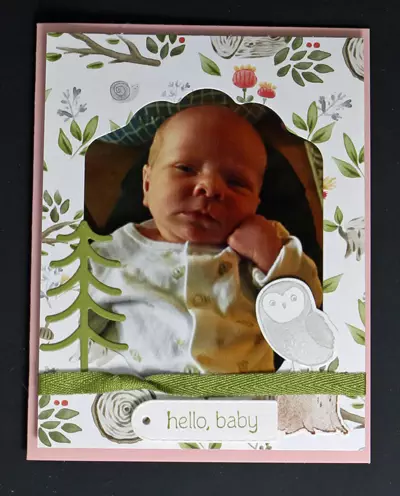
I used the Happy Forrest Friends Suite to create this cute Baby Announcement Card of my super cute Great Niece, Maia. I left the inside blank, so Julie could write a Thank You for the gifts that she received or Maia’s particulars.
SUPPLIES
Stamps:
Happier Than Happy (cling 158944) * This is part of the Happy Forest Friends Suite (158956)
Inks:
Smoky Slate Classic Stampin’ Pad (147113)
Soft Suede Classic Stampin’ Pad (147115)
Old Olive Classic Stampin’ Pad (147090)
Paper (including Cutting Dimensions):
Blushing Bride Cardstock {CS} (131198) 5-1/2” x 8-1/2” scored at 4-1/4” [Card Base]
Happy Forest Friends 12″ x 12″ Designer Series Paper {DSP} (158941)* 4-1/4” x 5-1/2” *
Basic White Cardstock {CS} (159279) 2-1/2” x 6” & 3-3/4” x 5” [Card Insert]
Old Olive Cardstock {CS} (100702) 3-1/4” x 5”
Accessories:
Bone Folder (102300)
Clear Block B (117147), Clear Block C (118486) OR purchase the Clear Block Bundle and save 10%
Paper Snips (103579)
Old Olive & Sahara Sand Twill Ribbon Combo Pack (158955) – Old Olive 8” *
Stampin’ Cut & Emboss Machine (149653) OR Mini Stampin’ Cut & Emboss Machine (150673)
Seasonal Labels Dies (158951) – Largest Die (Frame)
Happy Forest Dies (158951) – Owl, Tree Stump, Tree and the Tag Dies *
Adhesive Sheets (152334)
Stampin’ Seal (152813)
Stampin’ Dimensionals (104430)
Mini Stampin’ Dimensionals (144108)
Medium Envelopes – Basic White (159236)
Photo
INSTRUCTIONS
1. Fold Blushing Bride CS Card Base in half; crease using Bone Folder. The fold should be along the left hand side.
2. Cut the Happy Forest Friends DSP using Seasonal Labels Dies – Largest Die and the Stampin’ Cut & Emboss Machine OR Mini Stampin’ Cut & Emboss Machine. Cut the Photo down to size. I place the Happy Forest Friends DSP Frame over the Photo, as a trial run to see if there needs to be anymore trimming. Flip the Happy Forest Friends DSP Frame over and put Stampin’ Seal all over the edges. Flip the frame over and adhere onto the photo. Press all over to make sure that it is glued on.
3. All on the same Basic White Strip, stamp the Owl using Smoky Slate Ink, stamp the Tree Stump using Soft Suede Ink, stamp the “hello, baby” using the Old Olive Ink. Cut them out using the coordinating Dies and the Stampin’ Cut & Emboss Machine OR Mini Stampin’ Cut & Emboss Machine.
4. Adhere a piece of Adhesive Sheet that is roughly the same size as the Old Olive Tree, to 1 side of the Old Olive CS. Cut out the Old Olive Tree, by placing the Tree Die on the opposite side of the Adhesive Sheet and run it through the Stampin’ Cut & Emboss Machine OR Mini Stampin’ Cut & Emboss Machine.
5. Adhere the Old Olive Tree to the Card Front by peeling off the protective layer of the Adhesive Sheet. Adhere the Stump using Stampin’ Seal. Only put Stampin’ Seal on the lower part of the Owl and adhere it.
6. Tie a knot on one end of the Old Olive Twill Ribbon. Flip it over and add Stampin’ Seal to the back of the ribbon. Adhere it to the Happy Forest Friends DSP layer, making sure that you cover the Owl’s Feet.
7. Adhere the “hello, baby” Tag using Mini Stampin’ Dimensionals
8. Adhere the Happy Forest Friends DSP layers to the Card Base using Stampin’ Dimensionals.
9. Decorate inside of Card and/or Envelope as you choose.
10. I would love to welcome Maia to our family. We are so blessed to have you.