
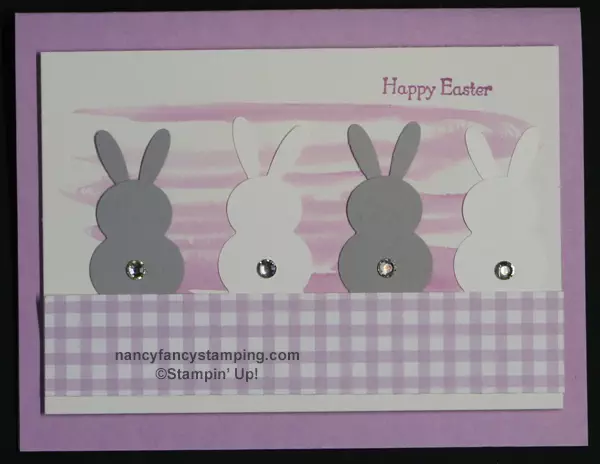
I hope that everyone had a great Easter. I made this quick and easy Happy Easter Punch Art Card. Punch Art uses Punches in a way that is different from it’s intended purpose. This helps you get more bang for your buck. Do you know which Punches I used to make the cute Bunnies? Read on to find out.
SUPPLIES
Stamp Sets:
Teeny Tiny Wishes (Retired).
Inks:
Fresh Freesia Classic Stampin’ Pad (155611)
Fresh Freesia Classic Stampin’ Ink Refill (155612)
Paper (including cutting dimensions):
Fresh Freesia Cardstock [CS] (155613) 5-1/2” x 8-1/2”
Fluid 100 5″ X 7″ (12.7CM X 17.8CM) Watercolor Paper (149612) 3-1/2” x 5”
Basic White Cardstock [CS] (159276) 2-1/2” x 6”
Smoky Slate Cardstock [CS] (131202) 2-1/2” x 6”
Pansy Petals 12″ X 12″ Designer Series Paper [DSP] (155807)
– Fresh Freesia Checker Pattern 1” x 5”
Accessories:
Bone Folder (102300)
Water Painters (151298) – Broad Brush Tip
Snowman Builder Punch (150643)
Medium Daisy Punch (149517)
Paper Snips Scissors (103579)
Rhinestone Basic Jewels (144220) – Largest Size
Take Your Pick (144107) – Mini Spatula Tip
Stampin’ Seal (152813)
Stampin’ Dimensionals (104430)
Basic White Envelope (159236)
Margarine Container Lid
INSTRUCTIONS
1. Fold your Fresh Freesia CS in half and burnish the crease using your Bone Folder. The fold should be along the top.
2. Fill the Water Painter (that has the Broad Brush end) with water. Squeeze it to get the brushes wet. Put drops of Fresh Freesia ink directly onto the margarine container lid, using the Fresh Freesia Classic Stampin’ Ink Refill. Pick up the Fresh Freesia ink and paint it on the Fluid 100 Watercolor Paper. You may want to test the color on a piece of photocopy paper before you paint it onto the Fluid 100 Watercolor Paper. Ink up the Happy Easter Stamp using the Fresh Freesia Classic Stampin’ Pad. Stamp it as shown. Set aside to dry.
3. Take the Snowman Builder Punch, flip it over and punch the Head, Middle section and a little into the Bottom section. This little piece of the Bottom section will give you something that you’ll use the adhere the Bunny to the Fresh Freesia Checker Pattern DSP. You repeat this process 2 times using Basic White CS and 2 times using the Smoky Slate CS. This is the Bunny’s body.
4. Take the Medium Daisy Punch, flip it over and punch at least 4 Daisy Petals. It is OK of you get part of another one. Using Paper Snips, cut the petals in 2 pairs. Make sure that you don’t cut them straight across. It is better to leave extra bits so you can adhere them to the Bunny body. You repeat this process using Basic White CS and using the Smoky Slate CS. These are the Bunny’s ears. You should have 2 sets of each color.
5. Flip the Fresh Freesia Checker Pattern DSP over and run 2 strips of Stampin’ Seal Adhesive. Adhere the Bunny ears to the bodies using Stampin’ Seal. Make sure that you add Stampin’ Seal to the back of the Bunnies. Adhere the completed Bunnies to the back of the Fresh Freesia Checker Pattern DSP using Stampin’ Seal. This is why it was a good idea to punch out a little extra of the Bottom section of the Snowman Punch. You position them so you can’t see the extra section.
6. Once your Fluid 100 Watercolor Paper is COMPLETELY dry, adhere the layer of Fresh Freesia Checker Pattern DSP/Bunnies.
7. Using the Take Your Pick – Mini Spatula Tip, pick up the largest size Rhinestone Basic Jewels and adhere them for the Bunny tails.
8. Did you ever think that Snowman Builder Punch and the Medium Daisy Punch could be used to make a Bunny? That is Punch Art for you.
Email Me or click here if you need anything to make this card